William J Turkel
Prototyping a Tangible Interface for Google Earth
February 11, 2008
Originally published at https://digitalhistoryhacks.blogspot.com/2008/02/prototyping-tangible-interface-for.html
As I mentioned in a previous post1, students in my digital history grad class this year are working in teams to create interactive exhibits that involve physical computing. Since none of the students have much prior experience with programming or electronics, I’m providing a bit of the scaffolding to help them realize their designs.
The design. One of the groups imagined an interface consisting of a handheld globe. As you touch a point on the surface of the globe, a computer display responds by orienting a corresponding digital globe to focus on that place, and then opens some panels with information about an event that happened there. They decided that Google Earth2 would make a good software platform. I left them to the task of creating their exhibit materials in the XML-based Keyhole Markup Format (KML3) that Google Earth uses.
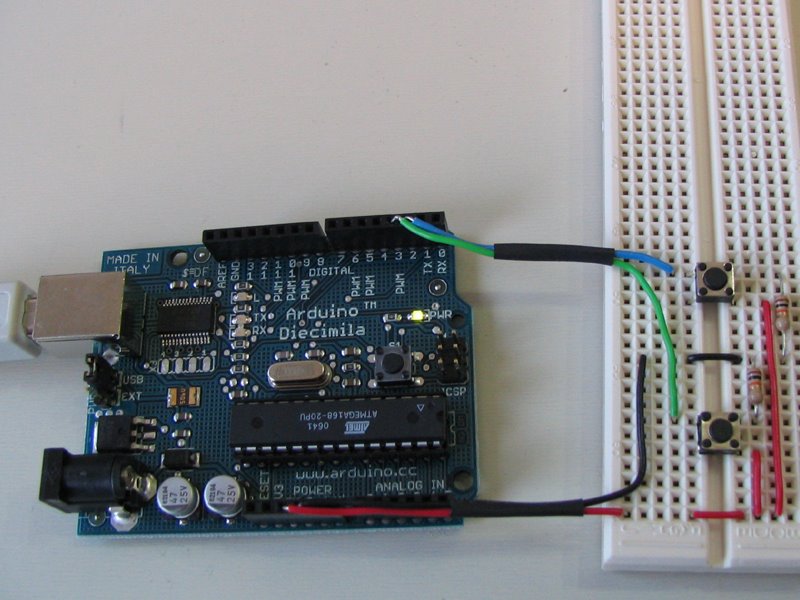
Hardware. The exhibit will be mounted on a laptop running Windows. For the tangible interface we’re using an Arduino4 microcontroller board. Normally-open pushbutton switches are connected to the digital inputs on the Arduino with 10K pull-down resistors. We debounced the switches in software, by reading their value twice at 10ms intervals. The Processing program that runs on the Arduino is here5. It maintains the state of the last button pressed, and sends it repeatedly over a serial connection to the PC. (If you’d like to try making something like this yourself, Lady Ada’s Arduino Tutorial6 is a great place to start).
Python glue. We needed a program to sit in between the Arduino and Google Earth, collecting information from the former and using it to control the latter. Python is ideal for this. First we installed the Python for Windows7 extensions and the Python Serial Library8. We were then able to control Google Earth via the COM API9. Our Python test program is here10. It first defines two functions, one to orient Google Earth to the main gates of the University of Western Ontario, and one to orient it to Uluru (Ayers Rock) in Australia. The program then initializes the serial port and Google Earth. Finally it enters an infinite loop, reading the serial port and calling one of the two navigation functions when the corresponding button is pressed. (If you’d like to use Python to control Google Earth, François Schnell has a very useful page11.)
Testing. I was quite impressed with how crisply the whole system works together. To get it running, you go through the following steps.
- Build and test the button circuit, then connect it to the Arduino.
- Start the Arduino software on the PC.
- Compile the Arduino program and download it to the board.
- Run the Python program. It will start Google Earth automatically in full screen mode.
- Once Google Earth has finished initializing, you can press the buttons to navigate within the program.
The final exhibit for our class will be mounted in April. You will be able to read more about it on the students’ blogs12 and at the exhibit website13. I’ll write about some of the other components in future posts.
Tags: Arduino14 | geocoding15 | Google Earth16 | history appliances17 | physical computing18 | Python19
Previous: Freedom of Expression
Next: OSes/2
Back to the blog archive
-
http://digitalhistoryhacks.blogspot.com/2007/11/physical-computing-cards.html↩ -
http://earth.google.com/↩ -
http://earth.google.com/userguide/v4/ug_kml.html↩ -
http://arduino.cc/↩ -
http://digitalhistory.uwo.ca/dhh/hacks/google_earth.pde.html↩ -
http://www.ladyada.net/learn/arduino/↩ -
http://sourceforge.net/projects/pywin32/↩ -
http://pyserial.sourceforge.net/↩ -
http://earth.google.com/comapi/index.html↩ -
http://digitalhistory.uwo.ca/dhh/hacks/google-earth.py.html↩ -
http://docs.google.com/View?docid=dgqhgsgm_933rjw93&pli=1↩ -
http://digitalhistory.uwo.ca/h513_0708/↩ -
http://digitalhistory.uwo.ca/sky/↩ -
http://technorati.com/tag/arduino↩ -
http://technorati.com/tag/geocoding↩ -
http://technorati.com/tag/google+earth↩ -
http://technorati.com/tag/history+appliances↩ -
http://technorati.com/tag/physical+computing↩ -
http://technorati.com/tag/Python↩