Introduction
We have already seen that the default assumption in Linux and UNIX is that everything is a file, ideally one that consists of human- and machine-readable text. As a result, we have a very wide variety of powerful tools for manipulating and analyzing text files. So it makes sense to try to convert our sources into text files whenever possible. In the previous post we used optical character recognition (OCR) to convert pictures of text into text files. Here we will use command line tools to extract text, images, page images and full pages from Adobe Acrobat PDF files.
Installation
[UPDATE 2014. If you are working with the HistoryCrawler virtual machine, the KDE GUI and PDF tools are already installed. Skip to the next section.]
Since we will be working with pictures of text as well as raw text files, we need to use a window manager or desktop environment. Start your windowing system and open a terminal. I assume that you already have Tesseract OCR and ImageMagick installed from the previous lesson. Now we need to install tools for working with Adobe Acrobat PDF documents. Try
man xpdf
man pdftk
man pdftotext
If you don’t get a man page for xpdf, then install it with the following.
sudo aptitude install xpdf
If you don’t get a man page for pdftk, then install it.
sudo aptitude install pdftk
If you don’t get a man page for pdftotext, then install the Poppler Utilities with the following command. This package includes a number of useful tools. The apropos command shows all of the tools that we now have at our disposal for manipulating PDF files.
sudo aptitude install poppler-utils
apropos pdf | less
Viewing PDFs
Adobe’s portable document format (PDF) is an open standard file format for representing documents. Although PDFs can (and often do) contain text, they are not easily read using Linux commands like cat, less or vi. Instead you need to use a dedicated reader program to view PDFs, or command-line tools to extract information from them.
Let’s start by downloading a PDF to work with. We will be using a 1923 book about the wildflowers of Kashmir from the Internet Archive.
wget http://archive.org/download/WildFlowersOfKashmir/KashmirWildflowers.pdf
[UPDATE 2014. If you are using HistoryCrawler, you can view the PDF with Okular. The ampersand runs the process in the background, allowing you to continue using your terminal while looking at the PDF.
okular K*pdf &
Spend some time getting to know the capabilities of Okular, then skip ahead to the next section.]
If you don’t have a GUI, you can view this document using xpdf. Try searching for a word, say ‘China’, using the binoculars icon. You may have to enlarge the xpdf window a bit to see all the icons at the bottom. Note that we are also running the process in the background (using the ampersand on the command line) so we can continue to use our terminal while viewing PDFs. When you use the mouse to close the xpdf window, it kills the process. You could also use the kill command from the terminal to close it.
xpdf K*pdf &
Extracting text
The pdftotext command allows us to extract text from an entire PDF or from a particular page range. We start by grabbing all of the text from our document, then using the less command to have a look at it. If a document is born digital–that is, if the PDF is created from electronic text in another application, like a word processor or email program–then the text that is extracted should be reasonably clean. If it is the product of OCR, however, then it will probably be messy, as it is here. We can, of course, use all of the command-line tools that we have already covered to manipulate and analyze the KashmirWildflowers.txt file.
pdftotext KashmirWildflowers.pdf KashmirWildflowers.txt
less KashmirWildflowers.txt
egrep -n --color China KashmirWildflowers.txt
Extracting page images and creating a contact sheet
This source contains a number of photographs, and we can extract these using the pdfimages command. By default, black and white images are stored as a Portable Bitmap (pbm) file, and colour ones as a Portable Pixmap (ppm) file. When you use ImageMagick display to view these files, they show up as white on black unless you use the -negate option.
mkdir images
pdfimages KashmirWildflowers.pdf images/KashmirWildflowers
ls images
display -negate images/KashmirWildflowers-025.pbm &
If you spend some time exploring the image files in the images directory, you will notice that many of them are pictures of text rather than flower photographs. This is to be expected in an OCRed document, because each text page starts as a picture of text. It would be nice to see all of the images at once, so we could figure out which ones actually are pictures of flowers. If we were using a graphical file browser like the Mac Finder or Windows File Explorer, we would be able to look through thumbnails and drag and drop the files into different directories. (Linux GUI desktops like KDE also have a lot of options for graphical file browsing, if you want to go this route.) Instead, we are going to use ImageMagick to make a ‘contact sheet’, a single image comprised of thumbnails of the first hundred image files in the images directory.
montage -verbose -label '%f' -define pbm:size=200x200 -geometry 100x100+38+6 -tile 5x images/*0??.pbm[100x100] images-contact.jpg
display images-contact.jpg &
In the command above, we use the -verbose option to tell ImageMagick that we want feedback on what it is doing. The -label option says each thumbnail should be labeled with its filename. We resize the incoming images with the -define option and with the stuff in square brackets appended to the source filename pattern. (This is so we don’t run the risk of running out of memory by storing lots of huge pictures during processing). The -geometry option tells ImageMagick to output thumbnails of 100 by 100 pixels, with some room around each to include the caption. The -tile option says to put the output in 5 columns, and as many rows as necessary. We use wildcards to specify the first hundred images. Once we have created our contact sheet, we can view it with display.
Iterating through an array
Now we want to copy the flower images in the first hundred pages to a new directory. We could type out one mv command for each file, but that would be pretty tedious. Instead we are going to store the numbers of the files that we want to move in an array, then use a bash for loop to step through the array and move each file.
We start by storing the file numbers
filenums=(025 028 032 035 038 040 043 046 050 054 057 060 062 065 069 073 077 080 082 085 088 091 094 096 098)
The next step is to loop through each element of the array and create a full filename from it. We want to test this part of the process before using it in a command, so we simply echo each filename to the terminal.
for num in ${filenums[@]} ; do echo images/KashmirWildflowers-${num}.pbm ; done
That looks good. Make sure you are in the directory that contains KashmirWildflowers.pdf and then modify the for loop to copy the flower images to a new directory, as shown below. When we finish, we make a new contact sheet of the flower images.
mkdir flowerimages
for num in ${filenums[@]} ; do cp images/KashmirWildflowers-${num}.pbm flowerimages/ ; done
ls flowerimages
montage -verbose -label '%f' -define pbm:size=200x200 -geometry 100x100+38+6 -tile 5x flowerimages/*.pbm[100x100] flowerimages-contact.jpg
display flowerimages-contact.jpg &
The contact sheet of all the flower images in the book looks like this:
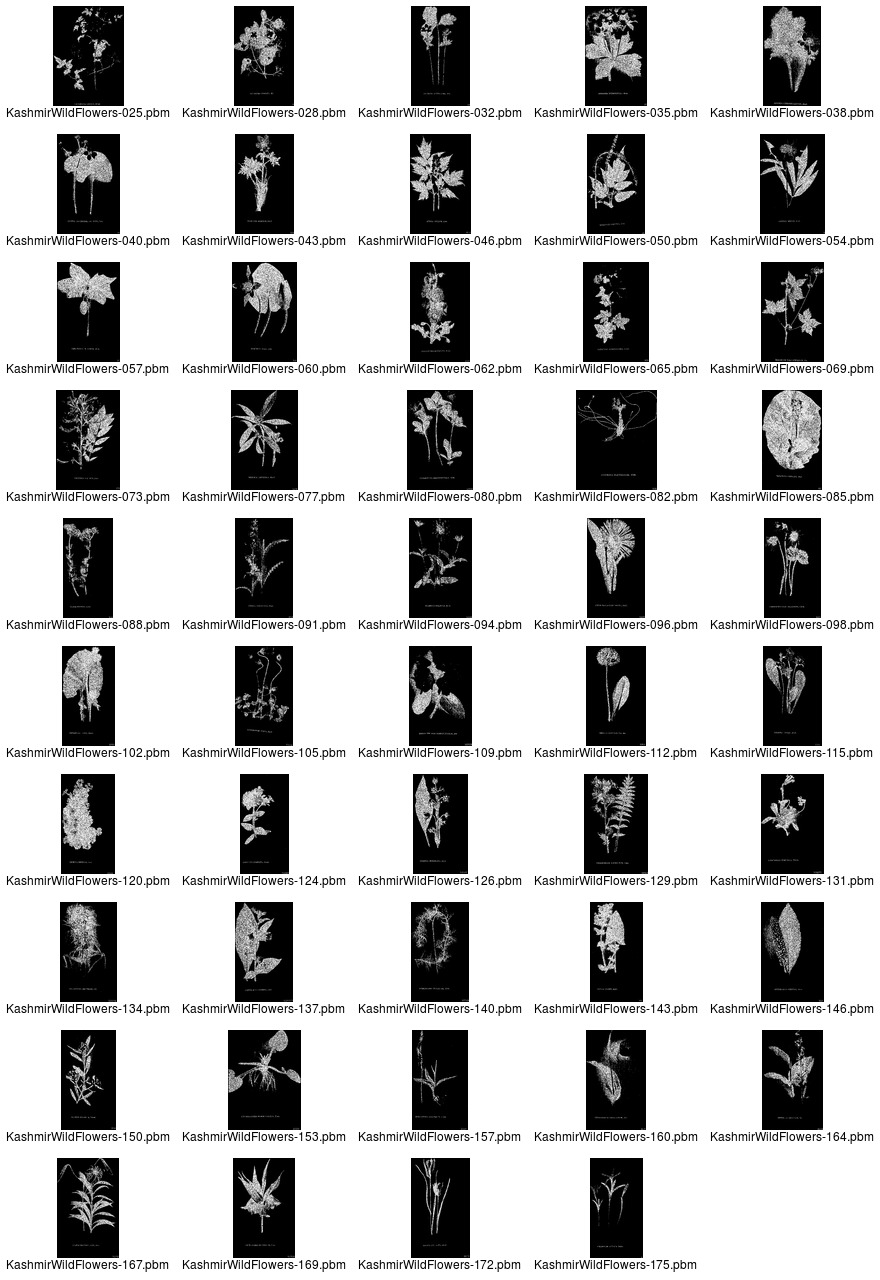
The image with flowers from the first hundred pages is about half as long.
An alternative workflow would be to use Okular or xpdf to identify the pages for each flower picture, and then use the -f and -l options for pdfimages to extract just the page images we are interested in. Experiment with this approach.
Compiling individual image files into a new PDF
If we have a collection of image files in a directory, we can compile them into a new PDF using the ImageMagick convert command. Here we use the -negate option so the final result is black on white instead of inverted.
convert -negate flowerimages/*.pbm flowerimages.pdf
View the output with Okular or xpdf. The same technique could be used, for example, to aggregate all of the photographs taken during a day of archival work or fieldwork into a single PDF.
Manipulating PDFs with pdftk
The pdftk command gives us a variety of options for manipulating PDFs. Here are a few examples. After trying each one, use Okular or xpdf to see the results.
The third page of KashmirWildflowers.pdf is a photograph of Dal Lake. In the original publication it was rotated so that it would fit better when printing, but for onscreen use we might prefer to have it the right way up. The command below extracts the page and rotates it ninety degrees clockwise.
pdftk KashmirWildflowers.pdf cat 3east output KashmirWildflowers-p003-rotated.pdf
Pages 230-233 of the original document contain a general index. We can extract just these pages into a separate PDF with the following command.
pdftk KashmirWildflowers.pdf cat 230-233 output KashmirWildflowers-pp230-233-index.pdf
The pdftk command gives us a way to extract metadata from PDFs, too. We can also access the same information with the pdfinfo command. Using the commands below, we can see that our original PDF has a number of associated key-value pairs.
pdftk KashmirWildflowers.pdf dump_data | less
pdfinfo KashmirWildflowers.pdf
The key Creator, for example, is associated with the value Adobe Scan-to-PDF Utility 4.0, and the CreationDate was Feb 2, 2012 around three-thirty in the afternoon. If you run the following commands, you should find that the Creator and CreationDate are different for a file that you just created.
pdftk KashmirWildflowers-pp230-233-index.pdf dump_data
pdfinfo KashmirWildflowers-pp230-233-index.pdf
Bursting a PDF
In a previous post, we burst a long document into separate pages before indexing it with a search engine. We did this so that searches would result in more fine-grained matches rather than simply telling us that the whole document was somehow relevant. The pdftk command allows us to burst a PDF into single pages, and at the same time outputs file metadata to a file called doc_data.txt.
pdftk KashmirWildflowers.pdf burst
less doc_data.txt
mkdir docpages
mv pg*pdf docpages
View the third page to check your work, using
xpdf docpages/pg_0003.pdf &
or
okular docpages/pg_0003.pdf &
Then …
pdftotext docpages/pg_0006.pdf KashmirWildflowers-p006.txt
less KashmirWildflowers-p006.txt
Adding metadata
Using pdftk, it is also possible to add metadata to a PDF, and even to attach other files to it. We start by using vi, atom or another file editor to create a file called KashmirWildflowers-metadata.txt containing the following information.
InfoKey: Title
InfoValue: Wild Flowers of Kashmir
InfoKey: Author
InfoValue: Coventry, B. O.
InfoKey: Keywords
InfoValue: London,1923,Raithby Lawrence and Company
Next, we update the PDF to contain this new information, then check our work. Note that the modification date metadata does not change automatically; we would have to do this explicitly if we wanted it changed.
pdftk KashmirWildflowers.pdf update_info KashmirWildflowers-metadata.txt output KashmirWildflowers-updated.pdf
pdftk KashmirWildflowers-updated.pdf dump_data
pdfinfo KashmirWildflowers-updated.pdf
We can attach files to a PDF and extract them again using the attach_files and unpack_files options of pdftk (see the man page for more details). The xdpf viewer shows attachments with a pushpin icon, but it does not let us inspect the attached files. Experiment with this if you are curious, but we won’t make use of the file attachment capability right now.


You must be logged in to post a comment.